Fluffy. Dreamy. Looks exactly like whipped cream but smells incredible.
If you’ve seen a whipped candle on TikTok and thought — I need to make that — you’re in exactly the right place.
Learning how to make whipped candles is one of the most satisfying things to try. They’re playful, beautiful, and once you nail the technique, completely addictive to create. The problem is most tutorials skip the details that actually matter — the temperature, the timing, the texture — and you end up with a lumpy mess instead of those gorgeous fluffy peaks.
This tutorial fixes that. Whether you’re a complete beginner or an experienced maker who’s had a few failed batches, this guide covers everything. Step by step. No skipping the important bits.
Affiliate Disclosure: This article contains affiliate links which means we may earn a commission at no extra cost to you. You can check our affiliate disclosure page here.
What You’ll Need to Get Started
Before you touch the wax, make sure everything is ready. Whipped candle making moves fast once the wax starts cooling — you don’t want to be hunting for your wick mid-whip.
The Wax 🕯️
The right wax is everything for whipped wax candles — these are the ones that whip up beautifully every time.
Paraffin Wax — best for fluffy stiff peaks.
Soy Wax Flakes — for a softer natural whipped texture.
Coconut Wax — for a creamy rich whipped finish.
The Tools 🛠️
You need the right equipment to get that perfect fluffy texture — these three make all the difference.
Hand Mixer or Stand Mixer — the non-negotiable tool.
Candle Thermometer — for hitting the perfect whipping temperature.
Piping Bags and Nozzles — for beautiful peaked frosting finishes.
What Are Whipped Candles Exactly
Whipped candles — also called whipped wax candles or frosting candles — are made by whipping melted wax as it cools until it reaches a light fluffy texture similar to whipped cream or buttercream frosting.
They can be:
- Piped into jars like a cupcake frosting swirl.
- Spread onto a regular candle like frosting on a cake.
- Shaped into standalone dessert candle designs.
- Layered with colour and scent for a full dessert candles diy effect.
The result looks good enough to eat — which is exactly why they’ve taken over candle making communities everywhere.
What Wax Works Best
Not all wax whips the same way. This is the part most tutorials skip — and it’s why so many first attempts go wrong.
- Paraffin wax is the classic choice for whipped candle frosting. It whips up stiff, holds peaks beautifully, and gives you that thick glossy whipped cream look. Easiest for beginners.
- Soy wax gives a softer more natural result. The peaks are less defined but the texture is creamy and beautiful. Slightly trickier — it moves faster as it cools.
- Coconut wax is the most luxurious option. It whips into a rich creamy texture and holds scent incredibly well. Peaks won’t be as sharp but the colour and glow are unmatched.
Start with paraffin wax for your first attempt. Once you’ve nailed the technique, experiment from there.
Step by Step — How to Make Whipped Candles
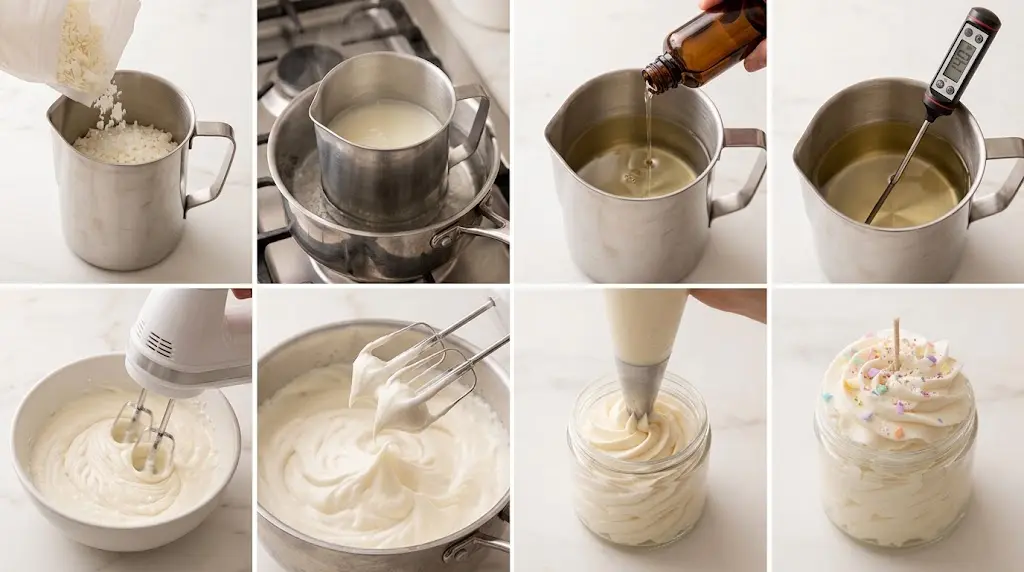
Step 1 — Melt Your Wax
- Melt your wax in a double boiler or pour pitcher set over simmering water. Heat slowly and steadily.
- For paraffin wax, melt to 80-85°C. For soy, aim for 75-80°C.
- Use your candle thermometer throughout — temperature is everything in how to make whipped wax for candles and getting it wrong here affects the whole batch.
Step 2 — Add Fragrance and Colour
- Once fully melted and at temperature, remove from heat.
- Add your fragrance oil — 6 to 10% of your wax weight. Stir slowly for at least two minutes to fully bind it.
- Add your candle dye now if using colour. For dessert candles diy, pastels work beautifully — soft vanilla cream, blush pink, pale lavender. Stir until completely even.
Step 3 — Wait for the Magic Temperature
This is the most important step in the entire whipped candle tutorial. Most people rush this and ruin the batch.
Let your wax cool to:
- 54-60°C for paraffin wax
- 50-55°C for soy wax
- At this temperature the wax looks slightly cloudy and thicker at the edges. Still liquid but just starting to set. This is exactly what you want.
- Too hot — it won’t whip. Too cool — it seizes before you’re done.
- Watch it. Be patient.
Step 4 — Whip It
Now the fun part.
- Pour your cooled wax into a large mixing bowl. Using a hand mixer or stand mixer, start on medium speed.
- Within 30 to 60 seconds it transforms — liquid to thick creamy texture, almost like a milkshake. Keep whipping.
- It will thicken further into something that looks exactly like whipped cream. This is how to make candle wax look like whipped cream — it’s all in this stage.
- Stop when it holds soft peaks and feels like thick whipped cream when you lift the beater.
- For stiffer peaks — keep whipping a little longer.
- For a softer spreadable texture — stop a little earlier.
Step 5 — Work Fast
Once your whipped wax reaches the right texture you have 3 to 5 minutes before it sets too firm to work with.
Have everything ready before you start whipping:
- Jars or moulds in position
- Wicks already centred and secured
- Piping bags fitted with nozzles if piping
- Workspace completely clear
Don’t answer your phone. Don’t check Instagram. Just work.
Step 6 — Pipe or Spoon Into Your Container
For a cupcake candle making swirl:
Spoon whipped wax into a piping bag fitted with a large star nozzle. Pipe in a circular motion from outside in, finishing with a peak in the centre — exactly like frosting a cupcake.
For a whipped candle frosting diy spread:
Use a spatula to pile whipped wax generously on top of a pre-made candle base. Swirl and peak as you go.
For a standalone whipped wax candle:
Spoon directly into your jar or mould and texture the surface with a spoon or fork for that whipped cream effect.
Step 7 — Let It Set
- Do not touch it. Do not move it. Do not put it in the fridge.
- Let your whipped candle set at room temperature for a minimum of 4 hours — ideally overnight.
- Moving it before it’s fully set causes peaks to slump and texture to crack. The wait is part of the process.
Step 8 — Add Your Finishing Touches
Once fully set, this is where your whipped candle ideas really come to life.
- Dust with cosmetic grade mica powder for a frosted shimmer effect
- Add fake sprinkles for a dessert candle diy look
- Place a decorative cherry or berry on top for a sundae finish
- Pipe a second colour on top for a layered frosting effect
- Add a birthday candle for the full cupcake candle making experience
Trim your wick to a quarter inch and your whipped candle is ready.
Whipped Candle Troubleshooting
My wax won’t whip and stays liquid.
It’s too hot. Let it cool further and try again. You need it below 60°C before whipping will work.
My wax seized up before I could pipe it.
It cooled too much before or during whipping. Work faster next time and make sure your room isn’t too cold.
My peaks collapsed after setting.
The wax was either too warm when piped or moved before fully set. Hit the right temperature and leave it completely undisturbed.
My whipped candle has air bubbles.
Completely normal and part of the charm of diy whipped candles. For a smoother surface, whip at a slightly lower speed for longer.
The texture looks grainy not creamy.
The wax cooled unevenly during whipping. Next time whip in a warmer room and make sure temperature is even throughout before starting.
Whipped Candle Ideas to Try Next
Once you’ve nailed the basic technique, these whipped wax candle ideas will keep you busy:
- Strawberry shortcake — white whipped wax base, pink swirl on top, fake strawberry decoration
- Lemon tart — yellow tinted whipped wax in a round tin, lemon fragrance, icing sugar shimmer on top
- Hot chocolate — brown whipped wax in a mug, mini marshmallow decorations on top
- Birthday cake — layered pastel whipped wax with sprinkles and a birthday candle
- Lavender cloud — pale purple whipped wax piled high in a clear jar, dried lavender buds on top
- Vanilla soft serve — cream whipped wax piped in a tall swirl into a cone shaped mould
All of these work as standalone whipped candle ideas or as part of a dessert candles diy gift set — and every single one photographs beautifully for your candle business content.
Whipped candles look complicated. They really aren’t.
They just need the right temperature, the right timing, and someone to actually explain what’s happening at each step instead of skipping straight to the pretty finished photo.
Now you have all of that.
Go make something fluffy.
FAQ
What is the best wax for whipped candles?
Paraffin wax is the easiest starting point for whipped candle frosting — it holds stiff peaks well and is very forgiving for beginners. Soy and coconut wax both work beautifully too but require a little more practice to get the texture right.
How long do whipped candles last?
Whipped candles last as long as any other candle — 30 to 50 burn hours depending on the size and wax used. The whipped texture doesn’t affect burn time. Always trim the wick before each burn.
Why does my whipped wax look lumpy instead of creamy?
Usually a temperature issue — the wax was either too cool when you started whipping or cooled too fast during the process. Aim for a warmer room and hit the correct temperature range before whipping.
Can I add scent to whipped candles?
Absolutely. Add your fragrance oil at the melting stage before whipping — the same as any regular candle. The standard recommendation is 6 to 10% fragrance load by weight of wax.